Showing posts with label DIY. Show all posts

Saturday, August 3, 2013

A few Updates to the Child Bedroom

It´s been quiet around here lately as we are trying to enjoy our summer as much as possible.
I did however get a few small updates to our son´s bedroom done.

When I last showed you this room it looked looked like this:

IMG_20120723_190024


Soon after moving in, we put in carpet scraps to reduce the noise that was being heard by our downstairs neighbour.

And then we moved furniture around and called it a day…. until this month. It was finally time to make a few changes to room to make it a little more playful.

IMG_20130705_143722

Here are a few of the things we changed:

1. Paint:

One wall got painted in a dark teal to add a little more color and contrast to this room.

IMG_20130705_143812


2. Furniture:

We got my brothers old high bed and new bed sheets. i am still searching for a nice set of bedding that will fit into the room better, but for now the navy sheets and bedding work out just fine.

IMG_20130705_143742

We also changed the placement of bed and wardrobe.

IMG_20130705_143801

3. Accent color:

I covered the toy box behind my son´s desk with green wrapping paper so it can serve as a “shelf” for pens.

I covered the cushions of our story-time armchair in new fabrics.

IMG_20130705_143844

(Both fabrics I got inexpensively at Ikea). The chairs are still from my childhood.

So, what is left to be done?

1. We need a real rug/carpet to cover the floor.
2. I would like to create some kind of art station/desk area, as for now, paints and art supplies are all over the house.
3. I would like to add some artwork to the walls or create some kind of board so my son can display his creations.

All in all, these small updates cost less than 50$ (Paint, Paint Supplies and Fabrics).

Tuesday, February 19, 2013

A little bench for the hallway and 100 Posts

 A couple of weeks ago I found a little table at our town´s antique fair. 

IMG_20130113_112353

It had seen better times, but overall it was in good condition and I liked the lines.


Can you see its potential? With its curvy legs and strong built it was the perfect candidate for turning it into a little bench or stool.
Especially since the top “tiles” weren´t really my taste anyway.

IMG_20130113_112403

A few days later I went to the home improvement store to gather my supplies:
  • Fabric
  • White Paint
  • A Paint Roller
  • A Sponge for buffing up
  • Foam
IMG_20130203_085724


I already have an upholstery stapler.
This weekend I finally got work, by first roughing up the wood and cleaning the stool.
Next I added 1 layer of paint …

IMG_20130208_163636

… then a second layer …

IMG_20130208_204236

… and finally a third layer of white paint …

IMG_20130209_095529

Patience is key. I started on Friday night, added the second layer on Saturday morning and the final layer on Saturday afternoon.
Next, I started thinking about how to add the foam and fabric.

IMG_20130209_095529

As you can see from the above picture, I initially thought about just adding a small pad to the top, but then I decided on taking the fabric all aroung the stool. I forgot to take a picture, but I simply added another layer foam the size of the entire stool to the top. Then I added my fabric, flipped the stool over and started stapling.

IMG_20130209_190332

Here is how the stool looked like mid-way through. Unfortunately at that point all of my staples were used up and I had to wait to get new ones.


IMG_20130209_190401

Finally, after another couple of days, I was able to get more staples and to finish the foot stool.

IMG_20130219_081157

IMG_20130219_081223

Linked up here:
- Pinterest Challenge at YHL
- Pinterest Challenge at Bower Power

Tuesday, February 7, 2012

Organizing my "Office"

Last month, I shared how I was able to update our main living-room/bed-room/office to include a functional work area using my childhood desk.


This was working much better than what I had before, but the organzer in me wanted to go a step further. Since I am using the desk drawers as dresser replacement and the space behind the door as storage for diapers, I didn´t really have a lot of space to put away paper-work, office supplies, and cables.

So on Sunday while over at my parent´s house, I remembered a little desk-top organizer with drawers, which I had purchased at Ikea about 15 years ago or so.


You have probably seen these before. However, I am not sure though whether they are still being sold at stores.

Once I cleaned out the drawers (there was my make-up from 15 years ago in some of those drawers - yuck!!!) I got crafty.


I made a template and then cut out 4 copies of the template on pretty paper.

Late Night Project - So I have bad pictures again.
Next, I attached my cut-to-size paper to the drawers using spray adhesive.


Within half an hour of work, I was able to put my newly decorated drawers in place and to start re-organizing my desk.


See, now I have a space for my notebook cable, the cell phone adapter and a few other cables I use frequently. This is perfect spot for keeping them out of sight, but easily reachable.


I made simple lables for each drawer and put them into the designated slots.


What I like about the drawer organizer  is, that it gives me storage space on two levels. One to hide stuff and one to show off stuff. Perfect.

Now, I would love to paint it white but that will have to be for another month, since paint is not in the budget. Same goes for the desk by the way. Plus, I am not going to attempt painting furniture for the moment, since we have a beautiful -14 C outside (6.8 F). No way I am going to paint furniture with such pretty temperatures, lol.

As for the budget, this project cost me nothing. The drawer unit was mine from many years ago, I already had the scrapbook-paper and I also already had the glue.


Linked up here:

- Before and After Party
- Tuesday´s Treasures

Thursday, December 29, 2011

Christmas at my parents´ house

We spent Christmas Eve at my parents house with all of our family. 3 Days, lots of food, and lots of fun later I am finally getting a few pictures up.

My parents decorated the real tree with red ornaments, red and white wooden snowflakes and a few bells.

25 years ago, my dad got inventive and made a blinking fire for the nativity set.


The set consists of wooden figures placed under a tree-trunk. My dad created the little fire from match box sticks, parchment paper and an LED-light. It flickers on and off and I remeber we had it since my childhood days.

With Christmas over and only a couple of days until the new year, I am working on a best of post for the year.

Tuesday, December 6, 2011

Est. 2009

 Finally I was able to finish another frame more my son´s gallery wall. This time, I decided on making a frame with his name and year of birth using letters available here. There are thousands of great choices and it is a lot of fun to play around with different types of designs.
I simply saved all the letters I liked to a folder and then pulled them one by one into a picasa collage.


Lucas Name Frame

My squares ended up a tiny bit uneven, but I like the outcome anyway. Next, I printed the sign onto white paper, which was cut to fit into another white frame. 
Not completely happy, I decided on making another mat from a green piece of scrapbook-paper.
I used doubled-sided tape to attach my sign to the green mat and reassembled my frame:
 
IMG_20111206_122344

This will fit right in with all of the other frames I have so far and will make a great addition to my son´s room.

IMG_20111116_193536

The frame with the Zebra is the one housing my new name sign.

Now I just need to wish  a Happy Nikolaus-Day to everyone celebrating it.

Linked up here:
-Frugal Friday
- Show and Share Day

Sunday, November 20, 2011

Now for the Key

 Since I am in full-blown gallery-wall-creating-mode, I have another frame to share with you:

I don´t remember where I got this little key from. Only that I found it in between all the stuff I went through for our international move.
Since it didn´t take up too much space in a suitcase, I decided to take it with me.

IMG_20111115_204125

Together with a few other supplies, I created another little frame incoorporating the color scheme for my son´s room.

IMG_20111115_204847

I just cut some more of the scrapbook-paper to size, then I added some blue ribbon to the key, and attached this to the back of the frame´s back support.

IMG_20111115_205300

Here is the finished product:

IMG_20111115_205419

And here it is among its fellow frames:

IMG_20111116_193536

What do you think?


IMG_20111116_193610

Linked up here:
Tuesday´s Treasures
Frugal Friday
Before and After Party

Tuesday, November 15, 2011

Displaying a babyshower-invitation

 Next up for the gallery wall: Framing my son´s babyshower-invitation.

All I needed was the invitation, a navy-blue picture frame, and some scrapbook-paper.

IMG_20111111_151859

I cut a piece of the scrapbook-paper to size:

IMG_20111111_152122

And then I assembled the whole thing:

IMG_20111111_152339

Here is my frame among all the other wall gallery items:

IMG_20111111_152403

I am still thinking about what I will do next, but I´ll let you know when I get there.

Linked up here:
- House of Hepworths
- Before and After Party

Sunday, November 13, 2011

Even more Art for the Gallery

 For now, my knit-scarf hasn´t gotten very far (zero rows to be exact), but I did start another project for my son´s wall gallery. First up, here are my inspiration pictures:

451929934_qihh8zpg_c
261809225_z3erGS6k_c

I love the simple message of this line - a few words are all that are needed.
However, for my son´s wall gallery, I wanted this to be happier and decided to switch up the colors just a bit:

youmakemehappy-001

Here is the my version as I created it in Word. I used Tahoma script in size 90 and bold. Then I centered the words and colored the letters randomly but still following my overall color scheme. 
Next, I printed a copy and went to the store to get a nice large picture frame and a block of greenish scrapbook-paper.

IMG_20111111_150923

Once my art was framed, I decided I liked this project without the scrapbook-paper. Here is the finished product:


IMG_20111111_151426

Linked up here: Metamorphosis Monday
                          House of Hepworths
                          Before and After Party

Thursday, November 10, 2011

The Letter L


                                                                                          Source: twotwenty-one.com via Carina on Pinterest

Have you seen this jute-letter on pinterest? When I saw it, I had to pin it with the intention of creating one of these for my son´s room.

So the other day I went and got all of my supplies ....


... all of them except for one: I wasn´t able to find a wooden or styrofoam letter anywhere in my town.

At first, I figured I would just order one online, but all of the sites I looked at had higher prices for the letters (plus high shipping costs) than I wanted to pay for this project.

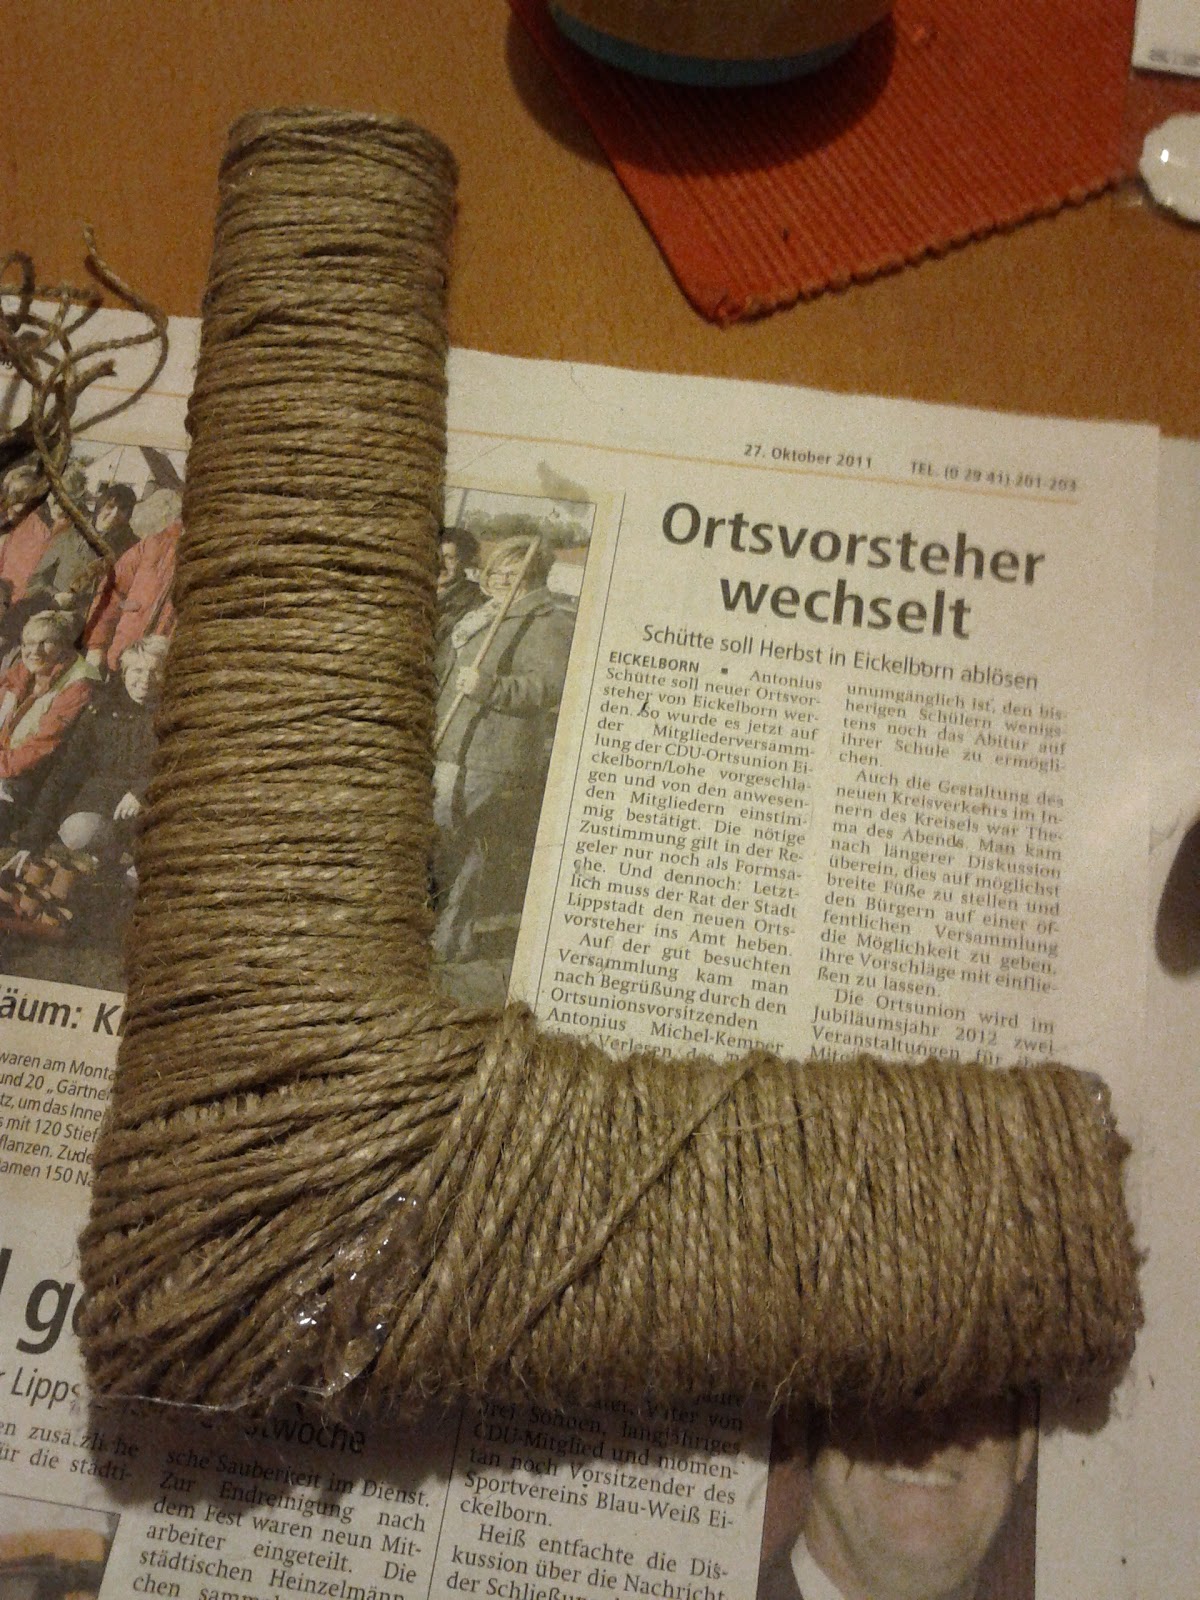
Then yesterday, while throwing away an empty diaper box I realized how I could create my own letter without spending a cent:


Can you see it?


Maybe now?


I cut out 4 L´s (each 25 cm high and 15 cm wide or 10 inches high and 6 inches wide ), layered them, and glued them together to give me one 3-dimensional L.
And all of that for the cost of one empty diaper box.

Next, I got out my supplies: 3 bundles of jute (20 meters each), 1 bundle of blue thick cord, and a small pack of green wood-beads.


I started by covering the ends with small pieces of jute and attached those with hot glue. Then I just went on and covered the whole thing by wrapping the cord around the letter. Whenever the cord didn´t want to stay put (at the ends and in the "corner"), I used some more hot glue to come to the rescue.

Next, I attached 3 green beads on a small piece of jute and hot-glued those to the letter as well. Once that was done, I used my blue cord to decorate the L a little more.


Since an "L" is a little difficult to attach to the wall evenly, I made sure to add little hooks to the backside of the letter:


These will enable me to make this letter part of a wall gallery I am planning for my son´s room.


These are the 3 pieces I have so far. Next time, I work on a letter like this I will try to reduce the amount of jute used in the corners, or increase the amount of jute on the straight parts, so that the entire letter is covered more evenly.

Eitherway, I am happy to move another project from my pinterest boards to the done board.

Linked at House of Hepworths, Metamorphosis Monday and Frugal Friday.