Saturday, June 23, 2012

Ikea Updates

I was so excited when I saw that Ikea updated their color scheme on the Kassett storage options, so I thought I´d share with you.

Source
You can see, that they are now also offering black, dark pink, and tan options.

I am loving these.

And for those patiently waiting for apartment updates: Things went a little slower than planned around here, but I am looking at decent sized apartments tomorrow, and will hopefully move by that week.

And then, the decorating can begin ( * so excited by the way).

Today at Ikea, I started out with a whole bunch of additional cooking and baking supplies, plates, and more.

I also got some basic bathroom supplies and will show all of you soon soon :)

Happy Sunday!

Tuesday, May 8, 2012

Room for Teens/Tweens

When I saw this capize-chandy in a local store´s weekly add, I thought immediately how nicely it could be incorporated into a teen or tween girl´s room.

Source
With this as my starting point, I started creating yet another moodboard incorporating a color scheme of olive green, apricot, purple, pink and light gray.

Immediately, I remembered these toss pillows which happen to have the same color scheme.

Source
So, here is without further ado, my room board for a teen or tween girl which is girly and fun, but not overly so:

The curtain panels, blinds, table lamp, mirror, night stand, purple blanket and wall art are all Ikea. The white headboard could be DIY. The rug was from google images, and I am not sure where to find something like this. As for the dresser - this could be easily found on craigslist and refinished. The slipper chair was also from google images.

Since this room is so very colorful, going with a neutral taupish gray would be the way to go.

Tuesday, March 27, 2012

A Laundry Room Moodboard

With some free-time on hand I started dreaming up a cute little laundry room space:

1. All of the items on this moodboard can be found at Ikea and are very reasonably priced.
2. The wall color is Benjamine Moore´s Wind Chime

What do you think?

Wednesday, March 14, 2012

DIY Recipe Box

IMG_20120314_135053

Yey, today ít´s finally Pinterest Challenge Time over at Young House Love, Bower Power and 2 other blogs. I am so excited to see all of the great projects completed all over blog-world.

First up, here is what I have been pinning recently:

Pinterest

Yep. Recipe Boxes. Many years ago, I sat down and created a recipe binder for all of my recipes.

IMG_20120314_125113

But over the years, it ended up more like this:

IMG_20120314_125035

Every time I found a recipe online, I would print it out and stick it in the front. So something had to be done here.

With improvement in mind I went on pinterest to see how others stored their recipes. Seing all of those pretty recipe boxes, I decided that this was what I needed in order to organize my recipe situation.

I already had index cards, and only needed some type of container or box to hold my recipe collection (with enough space for it to grow). At the $-Store (or since I am in Germany the EUR-Store) I found the right item.

IMG_20120314_125301

A cheap light green basket (picture is not true to color), that was the perfect size for my index cards.
At home I grabbed my scrapbook paper and started tracing out divider cards on some dark green cardstock.

IMG_20120314_125651

I used a small nail polish bottle to trace on tabs as well.

IMG_20120314_125822

I cut out my dividers and made sure they fit.

IMG_20120314_131728

Next, I used the white portion of the my scraps, to create lables to go on the divider tabs….

IMG_20120314_132800

… and attached them with the white side up on the dividers.

IMG_20120314_133349

Then I decided I also wanted to label the recipe box itself, so I took yet some more scraps and worked on that.

IMG_20120314_134313

I used Jute to attach this label to the front of my recipe box.

IMG_20120314_135103

And finally I started copying my loose recipes onto those index cards. That will probably take me a couple of nights. However, even if I should get lazy at some point and I can still cut whatever I wrote or printed a recipe on to size and just stick it in the box.

IMG_20120314_135424

So, what do you think? Isn´t this better than my previous overstuffed recipe binder?

IMG_20120314_135053

At least, now I have quite some space for new recipes ….

Linked up here:

- Tuesday´s Treasures

Tuesday, February 7, 2012

Organizing my "Office"

Last month, I shared how I was able to update our main living-room/bed-room/office to include a functional work area using my childhood desk.


This was working much better than what I had before, but the organzer in me wanted to go a step further. Since I am using the desk drawers as dresser replacement and the space behind the door as storage for diapers, I didn´t really have a lot of space to put away paper-work, office supplies, and cables.

So on Sunday while over at my parent´s house, I remembered a little desk-top organizer with drawers, which I had purchased at Ikea about 15 years ago or so.


You have probably seen these before. However, I am not sure though whether they are still being sold at stores.

Once I cleaned out the drawers (there was my make-up from 15 years ago in some of those drawers - yuck!!!) I got crafty.


I made a template and then cut out 4 copies of the template on pretty paper.

Late Night Project - So I have bad pictures again.
Next, I attached my cut-to-size paper to the drawers using spray adhesive.


Within half an hour of work, I was able to put my newly decorated drawers in place and to start re-organizing my desk.


See, now I have a space for my notebook cable, the cell phone adapter and a few other cables I use frequently. This is perfect spot for keeping them out of sight, but easily reachable.


I made simple lables for each drawer and put them into the designated slots.


What I like about the drawer organizer  is, that it gives me storage space on two levels. One to hide stuff and one to show off stuff. Perfect.

Now, I would love to paint it white but that will have to be for another month, since paint is not in the budget. Same goes for the desk by the way. Plus, I am not going to attempt painting furniture for the moment, since we have a beautiful -14 C outside (6.8 F). No way I am going to paint furniture with such pretty temperatures, lol.

As for the budget, this project cost me nothing. The drawer unit was mine from many years ago, I already had the scrapbook-paper and I also already had the glue.


Linked up here:

- Before and After Party
- Tuesday´s Treasures

Friday, February 3, 2012

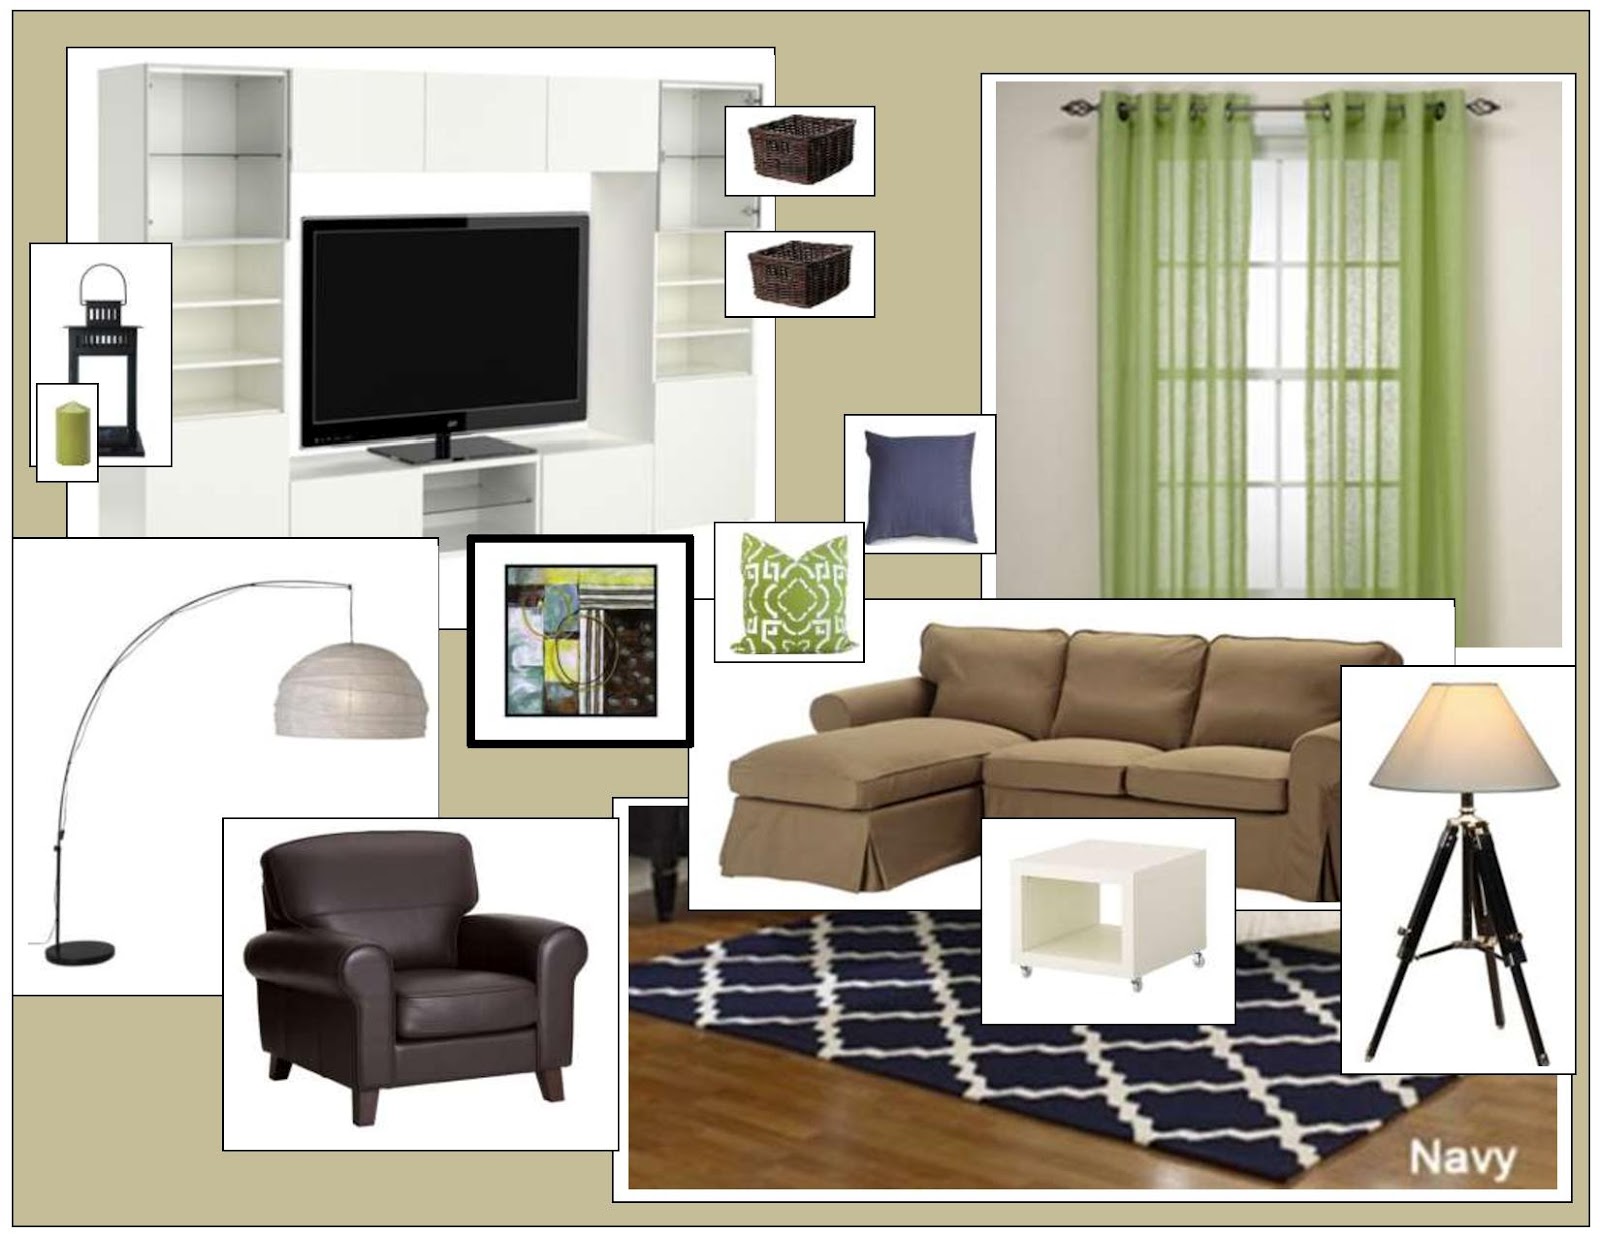
Navy and Lime Living Room

I´ve realized, that lately I was looking up a lot of decor items and rooms incorporating navy and lime green. I just love how fresh and inviting this color combination can be.

Since I love to create mood boards, I went with the living room in navy and lime this time.

Here you go:


  1. I started my board around this rug from Overstock. The trellis design is just gorgeous and very contemporary.
  2. This arm chair from Ikea tucked into the room´s corner could be part of a great reading nook.
  3. I decided to go with the Ektorp sofa (also from Ikea), as many people have raved about its comfort level. The Lack coffee table is also from Ikea and has space below to add a basket for the controls and other odds and ends.
  4. In order to bring in some lime green I chose this pillow from an Etsy seller and these curtains from B,B&B.
  5. A set of navy toss pillows from Target completes the assortment of textiles.
  6. To bring in some lighting I thought that a tripod lamp, such as the one in the picture, would look great.
  7. The blue and grellow wall art from Target pulls all the colors in the room together.
  8. The large white TVstorage unit is also from Ikea and provides lots of open and closed storage. Decorative vases and candles in the color scheme as well as books and family pictures in pretty frames will all look great in here.
  9. For the reading nook, I added another floor lamp from Ikea.
  10. Finally, for the walls I added a neutral beige color (such as Glidden´s Water Chestnut). 
 What do you think of this mood board, and the navy/lime green color combination?

Wednesday, February 1, 2012

Yummy Cinnamon Rolls - Superleckere Zimtschnecken

Last month, I tried a new cinnamon roll recipe from allrecipes.com and I just had to share this with you. Since making them the first time, my family has begged me pretty much every week to make another batch.

They take about 1 hour and a half to make. The dough is a dream to work with and the result ist just delicious.


I added a little bowl of vanilla pudding as I am not a fan of icing. Anyways, here is the recipe in case anybody is interested in trying these out:

Cinnamon Rolls
(Deutsche Anleitung weiter unten)

Ingredients/Zutaten:

  • 3/4 cup milk (180 ml Milch)
  • 1/4 cup margarine, softened (50 g Margarine)
  • 3 1/4 cups all-purpose flour (400 g Mehl)
  • 1 (.25 ounce) package instant yeast (1 Päkchen Trockenhefe)
  • 1/4 cup white sugar (50 g Zucker)
  • 1/4 cup water (60 ml Wasser)
  • 1 egg (1 Ei)
  • 1 cup brown sugar, packed (220 g brauner Zucker)
  • 1 tablespoon ground cinnamon (2 EL Zimt)
  • 1/2 cup margarine, softened (100 g Margarine)
  • 1/2 cup raisins (optional) (80 g Rosinen - nach belieben)

Directions:

  1. Heat the milk in a small saucepan until it bubbles, then remove from heat. Mix in margarine; stir until melted. Let cool until lukewarm.
  2. In a large mixing bowl, combine 2 1/4 cup flour, yeast, and sugar; mix well. Add water, egg and the milk mixture; beat well. Add the remaining flour, 1/2 cup at a time, stirring well after each addition (the dough will get pizza doough consistency). If needed add a little more flour. When the dough has just pulled together, turn it out onto a lightly floured surface and knead until smooth, about 5 minutes.
  3. Cover the dough with a damp cloth and let rest for 10 minutes. Meanwhile, in a small bowl, mix together brown sugar, cinnamon, softened margarine.
  4. Roll out dough into a 12x9 inch rectangle. Spread dough with margarine/sugar mixture. Sprinkle with raisins if desired. Roll up dough and pinch seam to seal. Cut into 12 equal size rolls and place cut side up in 12 lightly greased muffin cups. Cover and let rise until doubled, about 30 minutes. Preheat oven to 375 degrees F (190 degrees C).
  5. Bake in the preheated oven for 20 minutes, or until browned. Remove from muffin cups to cool. Serve warm (Be careful to put another baking tray below the rectangle as some of the melted sugar will drip down into the oven).
Don´t eat too many as these are dangerously good :)
 
Anleitung:
  1. Milch erhitzen, vom Herd nehmen, Margarine einrühren bis diese geschmolzen ist; Topf zur Seite stellen.
  2. In großer Rührschüssel 200g Mehl mit Hefe und Zucker mischen. Wasser, Ei und Margarinemischung dazu geben. Rühren.
  3. Nach und nach das restliche Mehl unterrühren. Teig dann auf bemehlter Fläche mit der Hand weitere 5 Minuten gut durchkneten (Teig sollte Pizzateigkonsistenz haben). Gegebenenfalls etwas Mehl dazu.
  4. Den Teig mit feuchtem Tuch bedecken und 10 Minuten ruhen lassen.
  5. In der Zwischenzeit Margarine mit braunem Zucker und Zimt mischen.
  6. Den Teig auf der bemehlten Fläche in ein Rechteck ausrollen und mit der Zimtmischung besteichen. Dann aufrollen und in ca. 12 Stücke schneiden.
  7. Stückchen auf der Seite in eine gefettete und gemehlte Backform oder Muffinförmchen legen. Weitere 30 Minuten ruhen lassen.
  8. Zimtschnecken auf mittlerer Stufe bei 190 C ca. 20 - 25 Minuten backen und dann warm servieren. (Vorsicht: Die Zimtschnecken tropfen ein bisschen, also Backblech unter die Backform schieben damit der Ofen nicht dreckig wird!)
Aufpassen! Zimtschnecken machen süchtig!